Best Monitors for Photo Editing 2025
If you’re searching for the best monitors for photo editing, you’re not alone. Many struggle with finding a display that nails color accuracy and sharp detail. Our guide cuts through the clutter by showcasing top-rated screens and monitors engineered for precise image work. Enjoy a vibrant creative boost with displays that bring your photos to life—the perfect upgrade for your editing needs. Let’s dive in and explore your ideal monitor today.
Contents
- Top 5 Monitors for Photo Editing:
- 1. Dell Ultrasharp U2723QE – Best Monitors for Photo Editing Overall
- 2. Benq PD3205U – Best 4K Monitor for Photo Editing
- 3. Apple Pro Display XD – Best Monitor for Photo Editing On A Mac
- 4. Philips Evnia 34M2C8600 – Best Ultra-Wide Monitor for Photo Editing
- 5. Asus Proart PA279CRV – Best Budget Photo Editing Monitor
- Things To Consider When Buying a Monitors for Photo Editing:
- Types of Monitors
- IPS vs. TN vs. VA Panels
- 4K vs. 1080p Resolution
- Key Factors to Consider
- Color Accuracy and Gamut
- Size and Screen Real Estate
- Tips for Choosing the Right Monitor
- Budget Considerations
- Brand Reliability
- Pros and Cons of Different Monitors
- Advantages of IPS Monitors
- Disadvantages of TN Panels
- Step-by-Step Guide to Monitor Setup
- Calibration Techniques
- Optimal Settings for Photo Editing
- Maintenance and Care
- Cleaning and Protection
- Software and Firmware Updates
- Conclusion
Top 5 Monitors for Photo Editing:
1. Dell Ultrasharp U2723QE – Best Monitors for Photo Editing Overall

Looking for a well-rounded photo and video editing workhorse of a monitor? Amid this crowded landscape, the Dell Ultrasharp U271CA stands out. It has a 27-inch screen with beautiful 4K resolution so everything is clear as day. If you’re working with colors, there’s also a very impressive 98% DCI-P3 color space coverage. With more precision, it means closer retouching.
USB-C connection makes it easier for you to connect and power your devices. This floating feature is a great help for designing people that work over a larger area. Added convenience, thanks to Power Delivery that lets your devices stay charged while you’re on the go.
One unique feature is the IPS Black technology. It increases the contrast ratio for richer blacks and in turn, a better viewing experience. The colors pop as never before, sparking your creativity as you edit photos or videos.
This monitor is certainly great, but it should be noted that it may take up more space than necessary on smaller desks. For others, it may entail some rearranging to get the most work space per square foot.
What I like most: Best of both worlds: On the Dell U2723QE, features and user-friendly design are equally prioritized. It does help your editing feel like a pro edit that’s for sure.
If you demand a high performance with good color accuracy, this monitor might be worth a look. Experience more with the most visual power of Dell Ultrasharp U2723QE!
2. Benq PD3205U – Best 4K Monitor for Photo Editing

Relish pristine color accuracy of BenQ PD3205U Monitor. Tailor-made for creatives, this 4K panel offers superb image quality when editing photos and video. You’ll love its stunning 99% sRGB and Rec. 709 coverage, so it’s an invaluable tool for your digital projects. True to life These true to life colors enable your work to stand out, produce highly detailed images in true colors.
A nice addition is the included KVM Switch. Multiple computers can be connected, then you can switch between them with a single click or by simply moving the mouse cursor. It’s a feature that increases efficiency, particularly for those who multitask. The customised hockey-puck control dial can be adjusted to a supercharged experience. Switch colour profiles, adjust brightness or change KVM settings at the touch of a button.
Its peak brightness may cap at 250 nits, but it’s a real stunner when it comes to color coverage. Lower light environment users get to enjoy the excellent accuracy with no hassle. Well-lit spaces may need to be positioned away from direct sunlight to prevent glare. This offers freedom during performances at different venues.
The focusing point of the BenQ PD3205U is color fidelity and some of the features are so brilliant and inavative compared to other similar models. * And because it’s built for your workflow, you can personalize its controls the way you like to work.
In the end, creatives should definitely take a look at the BenQ PD3205U if they need to fine tune their work. You might want to take a look at this monitor for your next upgrade so that you can take your editing experience to next level.
3. Apple Pro Display XD – Best Monitor for Photo Editing On A Mac

Unlock your imagination with the Apple Pro Display XDR. When it comes to photo editing on a Mac, this monitor really excels. And it provides gorgeous color accuracy even before you calibrate it, so you can fine tune your colors without the worry. HDR support for high values of brightness and black make it possible to present your work at the highest level.
It has an amazing design and build quality which many developers will love. Made with superior materials, this is a good looking monitor that has a quality feel to fit in any environment. There are no complicated technical hoops to jump through to get it set up, and it pairs effortlessly with your Mac, because it’s very much doing things the “just works” Apple way.
Picture editing photos where every nuance pops. Whether you’re in a vivid room or a dim studio, this monitor adjusts great to either kind of lighting. Compare this to competing models such as the Asus ProArt PA32UCX, which, while stunning on its own, isn’t fully compatible with Apple devices. The Pro Display XDR really is an experience all to its own for Mac users.
The Pro Stand’s price tag could be shocking, though. There are options for replacement stands available, but they might not be as refined. Few would argue the fact that Apple’s HDR content library trails behind, well, pretty much everybody but progress is progress. But you can still enjoy a great editing experience with what’s there.
What catches your eye is the fusion of design and functionality to help make your workflow seamless. If you’re looking to do high-end photo editing on a Mac, this is a monitor that you should definitely take notice of.
4. Philips Evnia 34M2C8600 – Best Ultra-Wide Monitor for Photo Editing
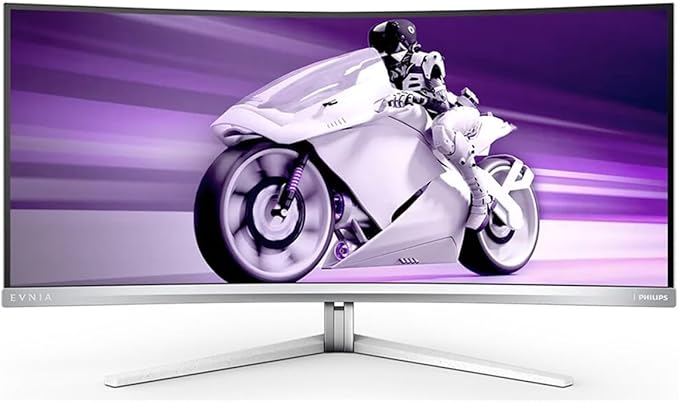
Discover the vivid imagination with the Philips Evnia 34M2C8600. This 34-inch ultrawide curved OLED monitor shines among a crowd of photo editing and gaming monitors.
My favorite thing about it is its beautiful QD OLED panel. It has a stunning 99.3% DCI-P3, so your colors look just as they do in real life. The 3440 x 1440 resolution adds clarity and brings out all the little details. Designers will also appreciate that it’s gotten just a slight 1800R curve to its display—it’s a bit of a middle ground, although with content at 34 inches it’s also enough that jaggies and distortion won’t bother you too much.
The quality of the build is impressive from the off. Setting up a contemporary workspace A sleek white and silver design creates a modern look. The stand is sturdy while offering 150mm of height adjustment and a 20 degree tilt. The USB-C port makes the monitor more versatile, and HDMI and DisplayPort connections provide compatibility across devices. While the OSD control button on the rear bungle takes a bit of getting used to, the menu is useful and intuitive.
Rotation features are something some people could miss, but in overall design of the monitor it compensates with enough screen. The 175Hz refresh rate is great for gaming and it has low response time for enhanced performance. Dynamic highlights come to life with the 1,000 nits peak brightness.
Philips Evnia 34M2C8600 performs well as a high-end option for photo and gaming. Appreciate the phenomenal screen, design, and performance. Step into the wonderful monitor and make the creative space more wonderful.
5. Asus Proart PA279CRV – Best Budget Photo Editing Monitor

Cheap and cheerful, the Asus ProArt PA279CRV is our pick of the best budget photo editing monitor. This display is a 27 inch IPS panel and features full 4K resolution that you can actually work in. You will love incredible graphics and fine details to complement your creative tasks.
Color reproduction is excellent with 99% of Adobe RGB and 99% of DCI-P3 covered. This is what makes your photos look great and true to life, which is very important if you’re doing any photo editing. This monitor is damn accurate right out of the box meaning you won’t have to fuss around with calibration as much as you do with some other brands.
Flexible connectivity makes it even more appealing. With USB-C and 96W power delivery, you can connect your laptops and other devices easily. Daisy chain to easily access further displays for better multitasking.
Sharp image quality is complemented by stunning 400 nits1 brightness for a display that shines in all environments. Although the contrast ratio is 1,000:1, this monitor remains on par with other budget screens. DisplayHDR 400 certification does restrict HDR performance, but it does well to strike a balance between quality and value.
What We Like Most About the ProArt PA279CRV The ProArt PA279CRV is impressive most because of how it manages to perform given its price. Many of the competition in this space doesn’t offer this level of color accuracy or connectivity.
While there are people who will want equally strong contrast, in colour terms and overall too, this screen is great. If you’re looking for a top quality but affordable photo editing solution then check out this stunning display!
Things To Consider When Buying a Monitors for Photo Editing:
Many factors come into play when you are looking to purchase a monitor for photo editing. Your choice can significantly impact your workflow and the quality of your work. From color accuracy and resolution to screen size and connectivity options, understanding these elements is key to making an informed decision. As you investigate into the options available, keep in mind your specific editing needs and how your monitor can enhance your creative process.
Types of Monitors
To choose the right monitor for photo editing, you should consider various types based on your needs. Each type has unique features that benefit photo editing differently. Here’s a quick overview:
IPS vs. TN vs. VA Panels
Even though all three panel types serve their purpose, IPS panels are preferred for photo editing due to their superior color accuracy and wider viewing angles. TN panels are faster but sacrifice color quality, making them less suitable for your editing needs. VA panels provide good contrast and color depth but fall short compared to IPS in color accuracy.
4K vs. 1080p Resolution
Types of resolution you choose will significantly impact your photo editing experience. While 4K offers four times the pixel density of 1080p, providing unparalleled detail and clarity, 1080p can still perform well for many editing tasks, especially if you are on a budget.
A 4K monitor not only enhances your editing precision but also offers a more immersive experience with vibrant, sharp images. The additional pixels allow you to see intricate details, making it easier to retouch and enhance your photos. If you frequently work on high-resolution images or require precise color grading, investing in a 4K monitor can greatly benefit your workflow.
Key Factors to Consider
You should take several key factors into account when selecting a monitor for photo editing to ensure you make the best choice. Consider these aspects:
- Color accuracy and gamut
- Size and screen real estate
- Resolution and pixel density
- Connectivity options
- Ergonomics and adjustability
Knowing these factors will help you choose a monitor that enhances your workflow and produces stunning results.
Color Accuracy and Gamut
The color accuracy and gamut of a monitor are imperative for photo editing because they determine how faithfully colors are displayed. A wider color gamut means your monitor can reproduce more colors, enabling you to edit images that look true to life.
Size and Screen Real Estate
Any photo editor knows that having sufficient screen real estate is important for a productive workflow. A larger monitor allows you to view images in greater detail and enables you to manage multiple windows and tools simultaneously.
Screen size plays a vital role in your editing experience. A larger display means you can see intricate details without squinting, providing a comfortable workspace for long editing sessions. Opting for a widescreen or ultra-wide monitor can further enhance your productivity, as they provide more horizontal space to arrange tools and palettes, allowing for a more organized and efficient editing setup.
Tips for Choosing the Right Monitor
One effective approach to select the ideal monitor for photo editing is to focus on key features that will enhance your workflow. Consider these aspects:
- Color accuracy and calibration
- Screen resolution and size
- Panel technology (IPS, VA, TN)
- Connectivity options
- Viewing angles
Perceiving the differences in these features will enable you to make an informed decision tailored to your editing needs.
Budget Considerations
Right from the start, it’s vital to establish a budget that aligns with your photo editing requirements. High-quality monitors can vary significantly in price, so assess which features are non-negotiable for your work. By prioritizing necessary attributes over luxury additions, you can maximize your investment while still achieving fantastic results.
Brand Reliability
Choosing a reputable brand for your monitor can significantly impact your overall editing experience. A reliable brand often indicates superior build quality, better customer support, and a track record of performance.
Understanding the history and reputation of various brands can guide you toward products that have proven reliability and longevity in the market. Researching user reviews and feedback can also provide insight into common issues experienced by other users, helping you make a decision with confidence. Investing time in learning about brand reliability ensures that you choose a product that will withstand the test of time and meet your editing needs effectively.
Pros and Cons of Different Monitors
After evaluating the various types of monitors available for photo editing, it’s important to weigh the pros and cons of each. Below is a comparative table to help you make an informed decision.
Advantages of IPS Monitors
Little can compare to the advantage of IPS monitors when it comes to color accuracy and consistency, making them ideal for photo editing tasks. Their wide viewing angles help you see true colors from various positions, reducing the chance of color distortion. This feature is particularly beneficial when working on collaborative projects where multiple people may be viewing the screen simultaneously.
Disadvantages of TN Panels
Advantages of TN panels include their fast response times, which cater to gaming and fast-moving visuals. However, they fall short in color accuracy and viewing angles, making them less suitable for photo editing purposes.
To probe deeper, TN panels utilize cheaper technology, offering a narrow color range and limited viewing angles. This means that the colors you see might not reflect the final output, which can be detrimental to your work. If precision and detail are important to your photo editing workflow, the disadvantages of TN panels can outweigh their advantages significantly.
Step-by-Step Guide to Monitor Setup
Not every monitor setup is alike; understanding the process can improve your photo editing experience significantly. Follow these steps to achieve optimal results:
Setup Steps
Calibration Techniques
While calibrating your monitor, utilize hardware calibration tools or software solutions to ensure accurate color reproduction. This process should not be skipped, as it significantly enhances the consistency of your edits across different devices.
Optimal Settings for Photo Editing
Assuming you want to get the most out of your monitor for photo editing, adjusting settings like color temperature and gamma can make a significant difference. Aim for a color temperature around 6500K for natural daylight that aligns with most editing standards.
For instance, adjusting your gamma to around 2.2 will provide a balanced contrast that helps in color grading your images effectively. Additionally, opting for a 100% sRGB color space can ensure that your images appear vibrant and true-to-life. Take the time to fine-tune the settings according to personal preference and the types of projects you work on.
Maintenance and Care
Unlike standard monitors, those specifically designed for photo editing require a bit more attention to ensure they perform optimally over time. Proper maintenance includes routine checks for any hardware issues, appropriate usage of settings, and environmental conditions that can affect screen quality. By making care part of your routine, you can extend the life of your monitor and maintain consistent color accuracy for your editing work.
Cleaning and Protection
There’s no denying that your monitor can gather dust and smudges over time, which can significantly impact image quality. Regularly cleaning the screen with a microfiber cloth and a gentle solution can help maintain clarity. Additionally, using a screen protector can shield your monitor from scratches and physical damage, ensuring your investment stays in peak condition.
Software and Firmware Updates
Maintenance of software and firmware is necessary for keeping your monitor functioning smoothly. Regular updates can enhance performance, fix bugs, and improve compatibility with photo editing software, allowing you to work more efficiently.
To stay ahead, make it a habit to periodically check the manufacturer’s website for the latest software and firmware updates. These updates can introduce new features or improvements that optimize your monitor’s performance for photo editing tasks. Enable automatic updates if available, or set a reminder for yourself to manually check for updates to guarantee you’re always working with the best tools at your disposal.
Conclusion
On the whole, selecting the right monitor for photo editing involves assessing factors such as color accuracy, screen size, resolution, and connectivity options. By prioritizing these features according to your specific needs, you can enhance your editing process and achieve more precise results. Investing time in choosing a monitor that meets your requirements not only improves your workflow but also elevates the quality of your finished images. Always evaluate your options carefully to ensure your choice aligns with your creative vision.